
I have wanted to try weaving for a long time, but was put off by the bewildering array of costly equipment involved, and complicated set up instructions. Then I discovered the Simple Frame Loom, ideal for impatient beginners like myself, wanting to see immediate results.
This blog entry details how I built my loom, and my first piece of weaving.
I made the frame, using some thin planks of dressed pine, mine were 42mm x 18mm, and cut to lengths of about 40 & 60 cm, to create an easily manageable rectangle.

I laid the long lengths under the short lengths, screwed the frame together at the corners with some recessed screws, and sanded down all the rough edges to prevent any snagging when weaving.
I decided the top and bottom of my frame would be the short ends, and stapled some cloth tape onto the edges to add extra friction for the warp threads to grip on to.
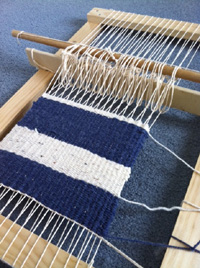
I wrapped warp thread strings around the frame, at approx 1cm intervals, making sure I went over the wood at the top of the frame and under the wood at the bottom of the frame.

Warp threads are usually fixed to a frame, and weft threads are woven in-between the warp threads to create fabric.
To make it easier to weave the thread in between the warps a shed stick is used to separate the upper and lower warp threads. Turning the shed stick through 90 degrees stretches out the gap for the weft thread to pass through, in this case from right to left. I made mine from a scrap piece of plywood 450 x 45 x 8mm thick. I made sure the edges were well sanded to prevent snagging.
To create a weave, the lower warp threads are raised and the warp thread woven back through a gap from left to right. I could have just used this shed stick to carry on weaving, removing it and re-threading it between alternate warp threads, but that seemed like a very long winded process. Some web research showed me that I could go a bit further with the loom design and add a heddle.
I made a very simple heddle stick from a piece of wooden doweling, approx 46cm long x 12mm diameter. I made a groove in either end, (turning the dowel on a worktable whilst sawing into the wood).
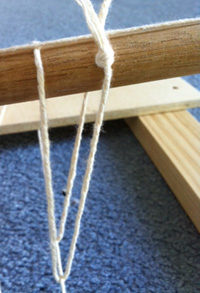
Now this was the most complicated bit… I made little Heddle loops out of 20cm lengths of string, and threaded them onto the heddle stick under every alternate warp thread and then back up onto the heddle stick.
I tied a length of string to each of the routed ends of the dowel, and this helps to hold all the heddle loops in place.
I found this technique at http://www.marlamallett.com

Lifting the heddle stick raised all of the lower warp threads, creating a gap for the weft yarn to be threaded through, (in this case left to right).
Then it was just a case of alternately moving the shed and the heddle stick up and down the warp threads, and passing my weft thread between the gap to start creating a piece of woven fabric.
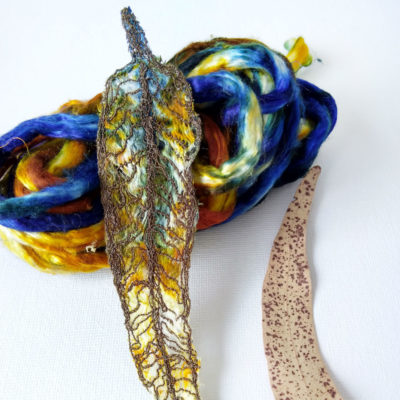
I used medium weight natural wool and cotton yarns, and closely spaced the wefts to create something that clearly states it’s a piece of woven fabric, with obvious undulations, it’s going to be purely for decorative purposes, and will form the basis of a wall hanging.